
Slow cranking kills batteries and starters. Most mechanics blame the battery first, then the starter motor. But half the time the real problem is voltage getting lost somewhere between the two. Relays, cables, connections, even the ignition switch—every point steals a little. Add it up and your starter sees ten volts instead of twelve. No wonder it struggles.
I learned this chasing a no-start on a customer's Gold Wing. New battery, rebuilt starter, still cranked like the engine was seized. Finally put a voltmeter on the relay output while cranking—dropped four volts across the contacts. Relay clicked fine, looked fine, tested fine on the bench. Under load, those pitted contacts were a brick wall.
Voltage drop testing finds what static tests miss. Here's how to do it right and what the numbers mean.
Why Static Tests Lie
Battery at 12.6 volts sitting still. Looks healthy. Relay clicks when you hit the button. Sounds healthy. Starter spins on the bench. Also healthy. But connect them all together under load and suddenly nothing works.
Resistance is the problem. Every connection, every inch of wire, every relay contact adds a little. At rest, no current flows, no voltage lost. Under starter load—150, 200, sometimes 300 amps—that tiny resistance becomes a big voltage loss. Ohm's law doesn't care about your test light.
I've seen relays that measured zero ohms with a meter. Dead short, theoretically perfect. Put 200 amps through them and they dropped three volts. Arced contacts, oxide buildup, microscopic gaps that a milliammeter won't find but a starter will.
Testing the Relay
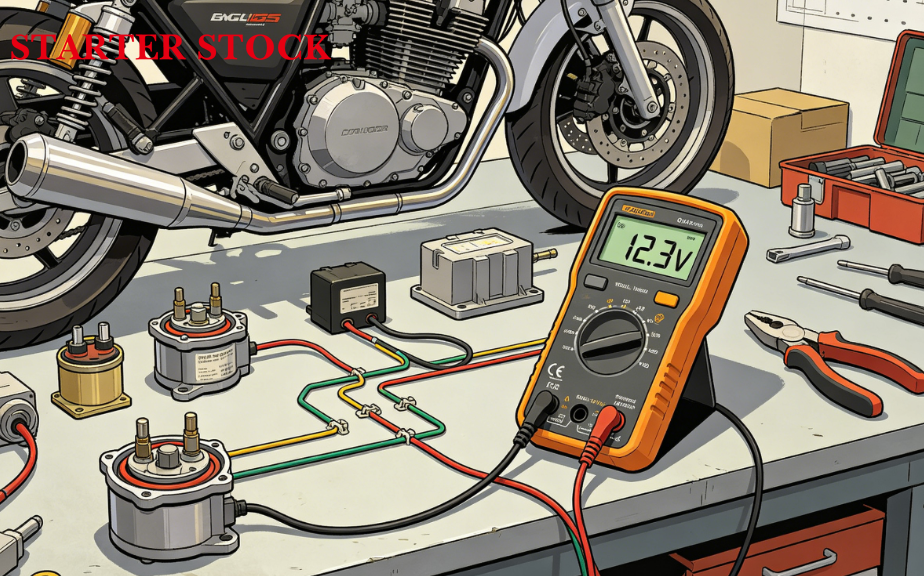
This is where most problems hide. Relay is the switch between battery and starter. High current, frequent cycling, arcing every time. Contacts degrade.
Put your voltmeter leads on both sides of the relay—input terminal and output terminal. Not the battery post and starter post. Right on the relay. Have someone hit the starter button. Watch the meter.
Less than 0.2 volts is good. Under 0.1 is excellent. Between 0.2 and 0.5, relay is tired but functional. Over 0.5, it's on the way out. Over 1.0, it's junk. I've measured 3 volts on a relay that still clicked and cranked—barely.
Bypass test confirms it. Jump the two big terminals with a heavy screwdriver or cable. Starter cranks strong, relay was the problem. Still weak, look elsewhere. Be careful—big sparks, keep away from fuel, don't hold it long.
Solenoid coils can drop voltage too. Measure from battery positive to the relay coil terminal, then from coil ground to battery negative. Should be minimal. More than 0.5 volts on either side and the coil isn't pulling hard. Weak magnetic force, contacts don't seat fully, more arcing, faster death.
Testing the Cables
Follow the path. Battery to relay, relay to starter, starter case to battery negative. Every segment.
Put one lead on battery positive post, other lead on relay input terminal. Crank. Difference is that cable's drop. Move to relay output to starter positive. Difference is that segment. Then starter case to battery negative post. That's ground side.
| Test Location | Acceptable Drop | Marginal | Replace/Repair |
|---|---|---|---|
| Battery post to relay input | < 0.1 V | 0.1 - 0.3 V | > 0.3 V |
| Relay input to output | < 0.2 V | 0.2 - 0.5 V | > 0.5 V |
| Relay output to starter terminal | < 0.1 V | 0.1 - 0.3 V | > 0.3 V |
| Starter case to battery negative | < 0.2 V | 0.2 - 0.5 V | > 0.5 V |
| Total circuit drop | < 0.5 V | 0.5 - 1.0 V | > 1.0 V |
Each segment should be under 0.2 volts. Total drop from battery to starter should be under 0.5. More than that and you're losing power somewhere.
Ground side matters as much as positive. Bad engine ground, bad frame ground, corroded battery terminal—all of it adds resistance. I've fixed more "starter problems" by cleaning and tightening the ground cable than by replacing starters.
Cable size is common issue. Factory cables barely adequate when new. Corrode, strands break, resistance climbs. Upgrade to larger gauge when replacing. 6 AWG minimum for most bikes, 4 AWG better. Oversized doesn't hurt, undersized kills performance.
Connections are where corrosion hides. Terminal looks clean outside, green and crusty where wire enters lug. Hidden resistance. Cut back, inspect, replace if questionable. Proper crimp, seal against moisture. I've seen "professional" crimps that pulled apart by hand.
Testing High Voltage Coils
Ignition coils step 12 volts to 20,000-plus. Voltage drop on the low side affects the high side. Weak primary voltage means weak magnetic field, means less energy transferred to secondary, means weak spark.
Test primary circuit same way. Battery to coil positive, coil negative to switch or ECU. Crank or run, measure drop. Should be minimal. More than 0.5 volts and the coil isn't getting full power.
Coil negative side matters too. Points or transistor switches the ground. Voltage drop across that switch, or in the ground path back to battery, robs primary current. Scope the primary waveform if you can—should be clean square edge, not rounded or sloped. Rounded means slow switching, usually from resistance or weak driver.
Secondary side you can't test for drop the same way—too much voltage, specialized equipment needed. But you can infer. Weak spark, hard starting when hot, misfire under load—all point to insufficient secondary voltage. Caused by weak primary, bad coil internal impedance, or plug/cap/wire losses.
Plug caps add resistance intentionally—5k ohm typical for EMI suppression. But they degrade. Crack internally, moisture gets in, resistance climbs or becomes intermittent. I've found caps that measured open cold, fine warm, then open again. Maddening. Replace them as maintenance.
Plug wires have resistance too. Suppression wire, carbon core, whatever. Should be specified—500 ohms per foot, something like that. Measure end to end, compare to spec. Much higher, wire is breaking down internally. Much lower, cap or wire is shorting.
Tools That Help
Digital voltmeter with min/max capture. Catches the drop during brief cranking. Hard to watch a bouncing needle. Min/max holds the worst reading.
Inductive current clamp. Clamp around the cable, see actual amps. Compare to starter spec. Low current with low voltage means high resistance. Low current with normal voltage means starter is mechanically dragging.
Scope is ultimate. See the waveform, see the ringing, see the slow rise from resistance. But expensive, learning curve. Start with voltmeter and logic.
Load tester for batteries. Simulates starter draw, watches voltage. Battery that drops to 8 volts under load is junk regardless of static reading. Test first, before chasing drops elsewhere.
Common Mistakes
Testing with accessories on. Headlight, fan, whatever. Extra load skews readings. Test with minimal load, just cranking.
Wrong meter leads. Cheap leads add resistance. Use heavy, short leads for high current tests. Or at least know your lead resistance and subtract it.
Not testing hot. Cold everything works. Heat expands, connections loosen, resistance rises. Test after a hot run when problems actually show up.
Ignoring total drop. Each segment tests fine, but added together they're over limit. Measure the whole path, not just pieces.
Assuming new parts are good. I've had new relays with bad contacts, new cables with corroded ends inside the lug, new batteries that failed load test. Trust nothing, verify everything.
Where I Get Parts That Test Right

After chasing too many voltage drop problems caused by junk parts, I source through STARTERSTOCK. Their relays have proper contact material and low internal resistance. I've measured drops under 0.1 volts on their heavy-duty units at full starter current. That's what you want.
Cables are real copper, proper gauge, proper terminals. Not CCA junk that looks like copper but has 60% higher resistance. I've cut open their cable ends—solid crimp, sealed against moisture, no corrosion hiding inside.
Coils match OEM spec. Primary resistance, inductance, turns ratio. I've tested with inductance meter, matches factory within tolerance. Means the impedance is right, energy transfers efficiently, spark is strong.
They publish specs. Actual numbers, not marketing. Contact resistance, cable resistance per foot, coil primary and secondary values. Lets you calculate, plan, verify instead of guessing.
Technical support understands testing. Called once about a relay that tested fine static but dropped voltage under load. Guy asked about my test setup, confirmed I was measuring right, sent replacement that tested clean. Didn't argue, didn't blame my meter. That's rare.
Bottom Line
Voltage drop testing finds the problems that static tests miss. Relay contacts, cable corrosion, bad grounds, weak connections—all of it shows up under load. Test right, find it, fix it.
Use good parts. Cheap relays with high contact resistance, cheap cables with undersized wire, cheap coils with wrong specs—they create the problems you're testing for. I buy from STARTERSTOCK because their stuff tests right the first time. Low drop, proper spec, consistent quality.
Hit the button, starter sees full voltage, engine cranks strong. That's the goal. Voltage drop testing gets you there.