

-
85
-
2025-09-16 09:11:32
A while ago, a friend of mine encountered a bad thing: there is a 2010 Chevrolet Jingcheng in his hand, and the wiper can't be turned off!The control buttons and relays of the wiper wiper (which are small parts that control the circuit to turn on and off) have been replaced, and even the rain sensor (a part that can sense how much rain it is) has been unplugged, and the problem is still there.He measured the voltage of the plug and the iron of the body for a long time (the metal part of the body is used as a zero wire), but he couldn't find the root. Finally, he wondered if the part responsible for the return of the wiper motor was broken, so the motor kept turning.
I asked him: “You didn't find the circuit structure diagram (a diagram of how the wires go)?"”He said he didn't find it, and he tested it blindly based on experience-after tossing it for most of the day, he scratched off half of his hair, and he didn't even have a precise idea.To be honest, I have been in the auto repair business for so long, and my friend didn't know that I had to look for information in advance, so I was full of frustration!Yes, I simply helped him analyze it together, and finally found out the fault point.
Just taking advantage of this, let me talk to everyone about how to test the wiper motor. They are all practical dry goods!
1. Figure it out first: why do wipers generally go wrong?
Let's take a look at the problem with the wiper first. These are the common reasons. Don't come up and just stare at the motor to change.:
Stuck with dirt: Leaves, mud, icing, and even deformed wiper blades can block the gap between the wiper and the glass, or make the wiper arm stuck and unable to move.;
The fuse is broken: The fuse of the wiper system (a small part of the protection circuit) is either the motor is stuck and cannot turn, the overload (the current is too large) is burned, or the wire is shorted (the wire skin is broken, the positive and negative electrodes touch together), and it has been used for a long time. Aging, the wiper will stop cooking as soon as it is broken.;
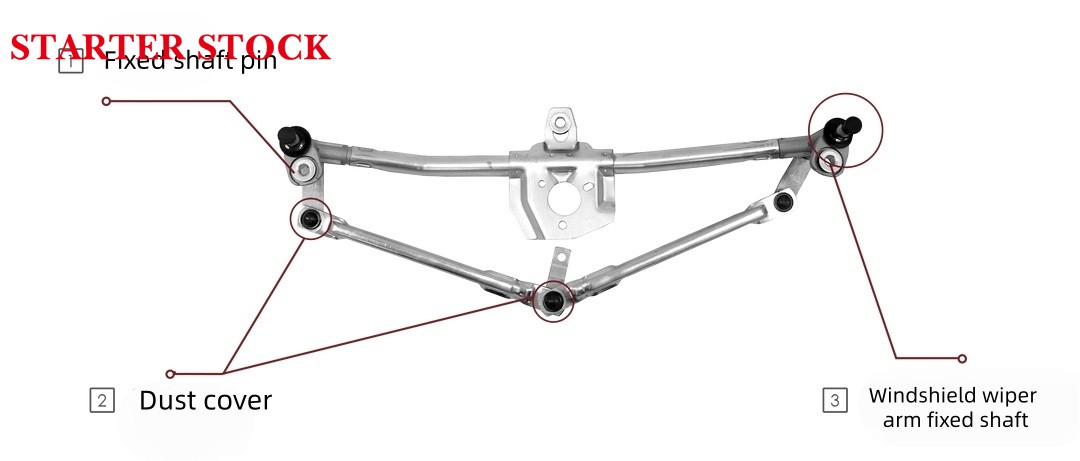
The transmission rod is loose/dropped: The metal rods (that is, the transmission rods) in the engine compartment that connect the wiper arm and the motor are loose or dropped from the buckle/joint. It is often “The motor buzzes and the wiper does not move.”;
The motor is not powered on: The wire harness is loose, the plug is rusty, the relay is broken, or the control button of the wiper itself is broken, and the electricity cannot be sent to the motor, and the motor will naturally not work.;
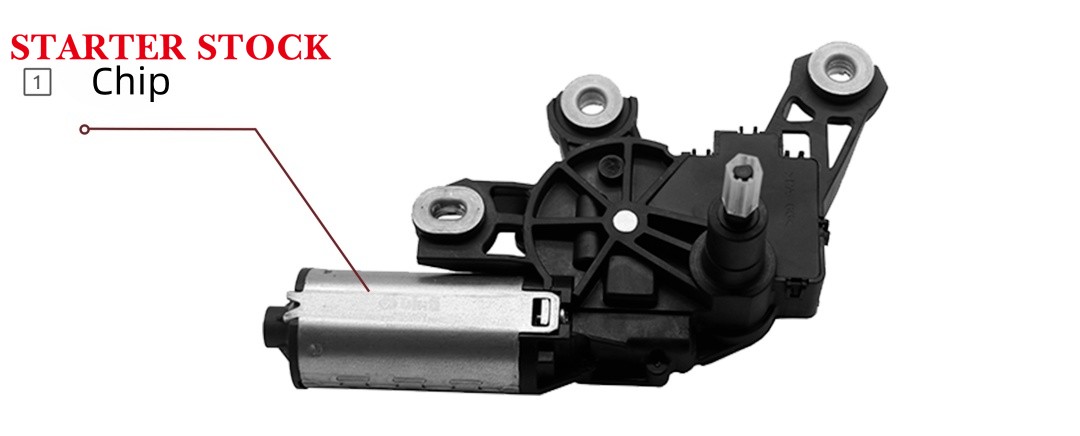
The motor itself is broken: The carbon brush (a small accessory for transmitting electricity in the motor) inside is worn out (the rotation strength is reduced), the gear is knocked out (it rings or gets stuck when it turns), and the coil (the copper coil in the motor) is burned (it doesn't turn directly). This is the problem with the motor itself.
2. Step by step test: from simple to complicated, don't go around!
There is a rule for detecting wiper failure: first check the simple ones, then touch the complicated ones, otherwise it will be a waste of time to test blindly like my friend.Let's follow the steps:
3.The first step: First look at the appearance and touch the parts, no need to power on!
Manually lift the wiper arm up and shake it back and forth——
If you feel stuck, or there is rust grinding, first wipe the dirt between the wiper and the glass with a soft brush or cloth, and then spray some silicon-based lubricating oil on the shaft connected to the wiper arm and the transmission rod (The oil that specifically lubricates the parts is not easy to get gray).In addition, let's see if the wiper blades are cracked or bent. If they are broken, change them. Don't settle for it.
Step 1: Check the fuse!Remove the motor if you don't come up
FIRST GO THROUGH THE MANUAL OF THE CAR AND FIND THE FUSE OF THE WIPER-USUALLY IN THE ENGINE COMPARTMENT OR IN THE FUSE BOX IN THE CAR, MARKED “WIPER” OR ”WIPER MOTOR".
Pull out the fuse and look at the wire inside: if it's broken, it's burned. Change it to the same current specification (such as 10a, 15a)!Remember, if the new fuse breaks as soon as it is plugged in, don't keep changing it. There must be other problems (such as a short circuit in the wire). Find a root first!
Step 2: Open the engine cover and see if the transmission rod moves at every turn
Open the cover of the machine, look down along the wiper arm, and you can look at the transmission rods.
Check if the transmission rod is loose, or it has fallen out of the buckle/joint-if it is loose, put it back as it is, tighten the buckle and screws tightly, and don't let it shake.
Step 3: Test whether the motor is powered up
Next, let's see if the motor can receive power. This step is very critical. It can eliminate many faults that are not motors.:
First look at the wire harness plug on the motor, whether it is loose or rusty-if it is rusty, wipe it clean with a wire brush or contact cleaner, and plug it in tightly if it is loose.
If you want to measure punctuality, take a multimeter (a tool for measuring voltage and current, not too expensive, just ordinary ones), and adjust to the "DC voltage" mode: let someone else turn on the wiper switch for you, and you touch the power interface of the motor plug with the red meter pen (you can find which one is the power cord in the manual, generally red or yellow), and the black meter pen touches the metal part of the body (equivalent to a zero line).
-If it shows 0 volts: the electricity is not delivered, the problem is the wire, control button or relay, and there is nothing wrong with the motor.;
-If it shows 12 volts (similar to the voltage of a car battery): either the motor is not connected to the power, or the motor itself is broken.
Step 4: Finally check the inside of the motor and you will know when you listen to the sound!
If the first few steps are okay, the wiper still doesn't work, then think about the inside of the motor.:
Turn on the wiper switch and listen carefully to the sound of the motor——
-No sound at all: there is a high probability that the coil (copper coil) in the motor has burned, or the internal wiring is broken.;
-It's “crunching” when it turns: the gears inside are worn out.;
-The rotation is slow and boring: the carbon brush (a small accessory for power transmission) is almost worn out, and it is impossible to power the rotor in the motor.
If you really want to do this, you can either change the motor, or if you can repair it, you can change the carbon brush or repair the gear (depending on whether it is cost-effective or not).
3. Practical case: How did the 2010 Chevrolet Jingcheng “wiper can't be turned off” be repaired?
Just saying that theory is useless, let's talk about my friend's Jingcheng and see how these steps are used.:
Fault condition
The wiper can't be turned off, the control buttons and relays are changed, and the rain sensor is unplugged. It is useless to suspect that the parts of the motor return to position are broken. After testing for a long time, I have no idea-the key is that I didn't find the circuit structure diagram, and I tested it blindly based on experience!
Prepare tools first
As we said earlier, there are just a few basic ones: multimeter (a tool for measuring voltage and current), slotted screwdriver (for removing the deflector), gloves (anti-hand tie), flashlight (take a picture of the dark part of the cover), and the manual of the car.
First step: Find the circuit structure diagram first!(It really doesn't work without a picture)
The first step is to find the circuit structure diagram of the Jingcheng wiper system-this thing is too important. I don't know how the wires go without a picture. It's just a blind collision.
3
Step 2: Understand how the circuit is controlled
A wiper is “dual control”: one is the wiper switch tube speed and speed gear, and the other is the rain sensor tube speed and speed gear. Two five-pin relays (relays with five interfaces) are also used, all controlled by the rain sensor.
Step 3: Unplug the motor and measure the interface voltage
Unplug the wiper motor and measure the voltage of the plugs 2, 3, 5, and 6.:
-The No. 3 interface is the normal power supply of the parts responsible for the return, and the voltage is normal;
-The No. 5 interface is actually charged!This does not match the circuit structure diagram, it must be some kind of power failure.
Step 4: Unplug the relay and measure the socket voltage
In order to find out where the electricity from the No. 5 interface came from, we unplugged the power relay (my friend has already changed it, excluding the No. 30 and No. 87 interfaces burned together), and tested the socket of the relay.:
-The No. 85 and No. 87 interfaces have electricity, and the No. 86, 87A, and No. 30 interfaces are out of power-at this time, it is suspected that the part of the control relay working has been working.
Step 5: Remove the relay shell and watch it move at every turn
Remove the relay shell and plug it back in, and find that the relay has been turning-the fault is locked on the wire that controls the power relay.And because the rain sensor was unplugged, it was not ready, so the sensor was excluded and the line from the sensor to the relay was kept in check.
Step 6: Test the iron connection of the relay interface No. 86
Unplug the power relay and the rain sensor, and measure whether the relay socket interface No. 86 is connected to the metal part of the body-it's actually connected!It shows that the line from interface 86 to interface 1 of the rain sensor is shorted when it touches the body (the wire touches the metal of the body, which is equivalent to a zero wire).
Step 7: Find a short circuit point and solve the problem
Finally found it: a screw was pressed on the wire harness of the rain sensor, which broke the wire skin and shorted it!Adjust the wiring harness, fix it, and try again-the wiper can finally be turned off!
4. We have to learn from this.
a. Before measuring the plug voltage, unplug the plug first!Otherwise, a parallel circuit with several wires walking together will measure false values.;
b. To measure the short circuit of the wire, you have to unplug the plugs at both ends of the wire harness, so that the test is accurate if the power is not turned on.;
c. Don't confuse the power relay with the relay that controls the speed and speed of the tube!My friend checked it wrong before and took a long detour.;
d. You have to understand how the five-pin relay works and what each interface is used for (for example, No. 30 is the interface where the power supply comes in, and No. 87 is the interface that is usually disconnected);
e. If the circuit is connected to other systems, don't worry about those first, keep an eye on the faulty small system first, and then check for others.;
f. For circuits that you can't understand, first find information (such as checking technical manuals and asking knowledgeable people), don't test blindly based on experience!
5. How to repair different faults?Be particular
lectrical fault (wire, fuse, relay)
-Use a multimeter to measure voltage and resistance to find problems accurately;
-If the relay is suspected to be broken, find a good one of the same model and try it. It can quickly rule out whether it is a relay.
Mechanical failure (transmission rod, wiper arm, motor gear)
-Don't be greedy for cheap replacement parts, choose original parts (parts used when the car left the factory) or reliable parts (adapted parts produced by other manufacturers), otherwise it won't take long and it will break.;
-When installing the wiper arm, the angle must be correct!If the angle is wrong, it will either not be scratched cleanly, or it will stiffen the motor, which is easy to break; don't forget to apply lithium-based grease (more durable grease, anti-rust) to the joints of the transmission rods.
How to judge after the test?One table is done
Give everyone the whole simple: what results are tested, what problems are corresponding to, and how to solve them?——
According to the test results, we can correspond to the cause of the failure and the solution according to the situation:
In the first case, if the fuse is found to be broken, there is a high probability that the transmission rod is stuck and the motor is overloaded, or the wire is shorted (for example, the wire skin is damaged, and the positive and negative electrodes touch together); at this time, you must first replace a fuse with the same current specification as the original, and then fix the overload problem in a targeted manner (such as cleaning up the transmission rod stuck) or short-circuited wires.
In the second case, if the motor cannot measure the voltage (showing 0 volts), the problem is usually caused by damage to the control button, broken wire, or relay failure; when solving, check the wire first, and repair it if it is broken. If the wire is no problem, replace the broken control button or replace it with a good relay.
In the third case, if the motor can measure a voltage of 12 volts but does not move at all, it means that the internal coil of the motor is either burned or stuck (for example, the internal parts are stuck); in this case, the motor basically needs to be replaced directly.
In the fourth case, if the motor rotates with abnormal noise, it is mostly due to severe wear of the internal gears, or the lack of oil in the bearing, which causes friction and sound; you can try adding special lubricating oil to the bearing first. If the abnormal noise is still there after the oil is added, you need to replace the motor.
In the fifth case, if the motor keeps turning and cannot be turned off, the main reason is that the wire of the control relay is shorted, or the wire of the rain sensor is damaged; at this time, it is necessary to focus on checking the wire connected to the control relay, find the location of the short circuit and repair it to solve the problem.
Finally, remind everyone
a. Don't break the parts hard!If the joint or panel can't be removed, first find out if there is a hidden buckle. If you break the plastic parts hard, you will have to spend money to match it later, so you can't make it.;
b. Take a picture before removing the transmission rod and wire harness!I can't remember how I pretended to be, it's more troublesome to pretend to be wrong when I look back.;
c. Let's start with a simple check!Fuses and transmission rods are the most prone to problems. Don't come up and disassemble the motor and take a long detour-my friend just didn't come in order and tossed it for nothing for most of the day!
In fact, it is not difficult to test the wiper motor. The key is to follow the steps and don't test blindly, especially if there is a circuit structure diagram-it is much better to check more information and ask more knowledgeable people when things happen than to think about it blindly!


