

-
92
-
2025-09-30 10:53:44
When the wiper or wiper motor fails, many car owners will choose to replace it by themselves, but in practice, they often take detours due to the wrong tool selection, neglect of angle marking, and missed inspection of wearing parts.
This article combines theoretical skills + real practical cases, from tool adaptation, disassembly and pit avoidance, key installation steps to special operations of different models, to organize a complete set of guidelines to help you efficiently complete the replacement and avoid rework.
1. Wiper and wiper motor replacement: tool adaptation and spare tool list
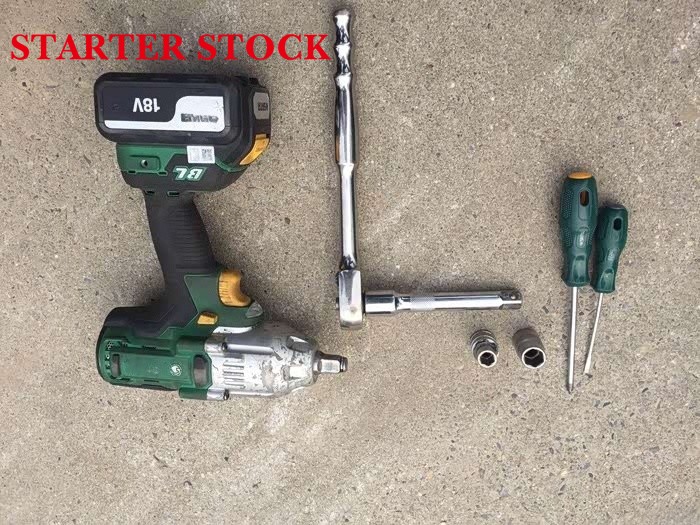
Choosing the right tool is the first step in a successful replacement. Mismatched tools can easily cause screws to slip and plastic parts to be damaged. The following are suggestions for tools with strong adaptability.:
1. Core tool specification adaptation
● Suitable for phillips screwdrivers: PH2 model is preferred, which is suitable for wiper nut covers and wiper motor fixing screws of more than 90% of models to avoid slippage of the screw groove due to the small cutter head.;
● Suitable for manual /electric wrenches: use with 8mm and 10mm sleeves. Most models of wiper motor fixing screws and wiper arm nuts are of these two sizes.It is recommended to adjust the electric wrench to a low torque gear (8-10N・m) to prevent excessive torque from breaking the screws.;
● Stainless steel slotted screwdriver: choose 6×100mm specifications, which are used to pry the wiper nut cover and deflector buckle. The edge of the cutter head needs to be polished and smooth to avoid scratching plastic parts.
2. Essential spare tools (easy to ignore but critical)
● Safety marker pen (black / red): used to mark the connection angle of the wiper motor and the connecting rod, the direction of the wiring harness plug, and prevent misalignment of installation;
● Electrical insulation tape: wrap the exposed interface when disassembling the wiring harness to avoid touching the cabin parts and causing a short circuit;
● Multi-compartment storage box: store parts according to the classification of "motor screws”“ "wiper nuts” and "wiring harness buckles" to prevent loss;
● Suitable for neutral rust remover: In view of the rust problem of wiper arm shafts and motor screws of old cars, spray in advance to soften the rust and avoid damage to parts caused by hard screwing.
2. Wiper removal: 3 key pit avoidance points to protect vulnerable parts
Although the removal of the wiper is simple, the plastic parts such as the nut cover and the cleaning fluid pipe are easy to damage. The following details need to be paid attention to:
1. Nut cover removal: avoid snap fracture
There is a buckle gap at the rear end of the nut cover at the root of the wiper arm. Use a slotted screwdriver to gently insert the gap and pry it upward. The force is controlled to “just pry it”.
Do not break it hard.If the buckle is accidentally broken, the wiper arm shaft needs to be temporarily wrapped with electrical insulation tape (to prevent rainwater from seeping into the rust), and the nut cover of the same specification will be reset according to the model.
2. Cleaning liquid tube treatment: empty the residual liquid and then unplug the tube
Before pulling out the plastic pipe of the wiper cleaning fluid, press the water spray switch in the car to empty the residual liquid in the pipe (to avoid leakage into the cabin and corrode metal parts or electrical components).
Observe whether there is a buckle at the interface when unplugging the pipe, press and hold the buckle and then gently pull it out. Do not pull hard to cause the pipe to break.
3. Wiper arm failure prediction: check the bushing by the way
When removing the wiper arm, gently rotate the wiper arm shaft: if you feel stuck, abnormal noise, or the shaft body is rusty, you need to check the wiper arm sleeve synchronously (the aging of the sleeve will cause the new motor to still get stuck after installation, you can apply grease or replace the sleeve).
At the same time, use a marker to mark the “main driver” and “co-pilot” wipers (the main driver's wipers are usually longer, and the reverse installation will cause the wipers to overlap).
3. Disassembly of the deflector and preliminary judgment of the wiper motor: prepare for the replacement of the motor
The deflector (the rear end part of the cabin cover) needs to be disassembled to protect the waterproof parts, and at the same time, it can be preliminarily determined whether the motor is faulty.:
1. Deflector disassembly: operate in sequence to prevent deformation and water leakage
● When removing the screws, gradually loosen them in the “diagonal order” (the deflectors are mostly made of plastic, and the force is uneven and easy to deform);
● The waterproof and shockproof materials (sponge / rubber) at both ends of the main deflector need to be gently stirred up and stored separately, and must be reset accurately during installation (otherwise it will leak on rainy days);
● Please avoid the cleaning fluid pipe and wiring harness when taking off the deflector, and put it lightly on the cover of the cabin. Do not throw it directly on the ground.
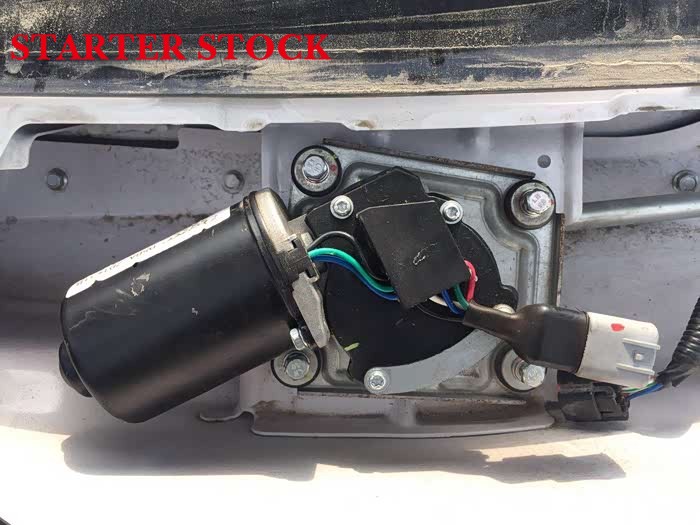
2. Preliminary judgment of wiper motor: fault can be checked without power-on
After the deflector is removed, the wiper motor (similar to a small motor, with a wiring harness) is exposed, and the fault can be judged by 3 points.:
● Carefully observe the motor shell: whether there are cracks or traces of water leakage (if so, the water inside the motor is damaged);
● *Check the wiring harness interface for oxidation and corrosion (loose interface will cause unstable motor power supply);
● Manually rotate the motor shaft: rotate gently, if the resistance is large and there is abnormal noise (indicating that the internal gear or bearing is damaged, the motor needs to be replaced).
4. Disassembly of wiper motor assembly: 2 core marks to avoid confusion in transmission angle
The key to disassembly of the motor assembly is to "maintain the angle of the connecting rod”, otherwise the subsequent wiper will not swing normally.:
1. Wire harness buckle disassembly: mark the docking direction
Press and hold the unlock button on the wiring harness buckle (mostly small red /black bumps) and gently unplug the plug. At the same time, use a marker pen to draw an alignment line on the “wiring harness plug” and “motor interface” (make sure the direction is correct during installation to avoid reverse burning the circuit).
2. Connecting rod angle mark: draw a through line to prevent misalignment
The wiper motor assembly is connected with two connecting rods (which convert the rotation of the motor into the swing of the wiper). Before disassembly, draw a horizontal through line (covering the motor and the connecting rod) at the connection part of the motor and the connecting rod (ball head / gear).]
The angle of the connecting rod is debugged by the factory. Random movement will cause the transmission to fail, and it needs to be installed strictly according to the mark.
In addition, due to the large recovery force of the spring, the light discharge motor assembly needs to keep the “connecting rod facing up”** to avoid extrusion deformation; if the spring force is too large, you can first hold the connecting rod by hand and place it slowly.
5. Wiper motor and wiper installation: 4 key steps to ensure normal function
Installation is the core link, angle alignment and testing links are indispensable:
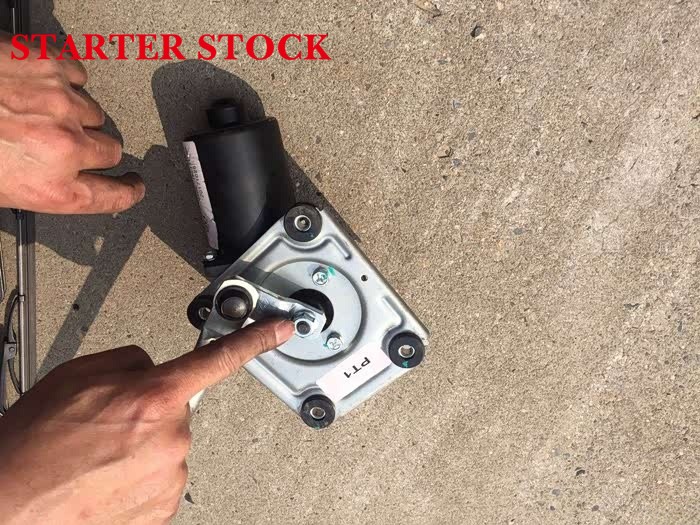
1. Pretreatment of new motors: compare the old motors first
After unpacking the new motor, compare the ** “Fixing screw hole position, wiring harness interface shape, connecting rod connection method” of the old motor; if the vehicle has a rain sensor or electronic control module, you need to confirm the matching of the control interface (to avoid inconsistent models).
2. Motor installation: align the angle first and then fix it
Align the angle of the connecting rod put the new motor in its original position to ensure that the "through line is completely coincident”, and then snap the connecting rod ball head into the motor interface (hear the ”click" sound to indicate that it is in place, gently pull the connecting rod to confirm that it is firm);
Set the fixing screws: first screw 2 diagonal screws (do not tighten, leave a 1mm gap), manually rotate the motor shaft (observe whether the connecting rod swings smoothly), and then tighten all the screws in diagonal order without caton.
3. Wiper arm installation: debug parking location
Press the ”Main driver/co-pilot" mark to set the wiper arm, first tighten the nut without tightening: manually push the wiper arm so that the wiper strip fits the glass, make sure that when the wiper is closed, the lowest point of the wiper blade is 1cm at the bottom of the glass (too high to leak, too low to scrape the cabin cover), confirm the position and then tighten the nut.
4. 3 tests must be done after installation
● Automatic function test: power on to test the wiper at low speed, high speed, and intermittent gears to confirm that the swing is smooth, and it can stop accurately at the bottom after it is turned off.;
● Sealing test: Spray glass water and scrape for 10 seconds to observe whether the roots of the deflector and wiper arm are leaking;
● Fine-tuning the angle of the wiper: If the wiper scrapes to the edge of the glass or leaks, loosen the nut to fine-tune the angle, and test repeatedly until the scraping is normal.
6. Special operation guidelines for different models: adaptation to family cars, SUVs, and old cars
1. Family car
The size of the deflector is small, and there is no need to support it after disassembly; the motor is installed laterally, focusing on the angle marking of the connecting rod (to avoid installation deviations due to the small cabin space).
2. SUV / off-road vehicle
The windshield is large and the wiper arm is long. The wiper arm can be removed with the help of a puller (if any); the deflector has a large area and is supported on the edge of the cabin with a bracket after disassembly (to prevent crushing of the lower parts); some models have 5 motor fixing screws, which need to be operated according to the actual number.
3. Old models (more than 10 years old)
The connection between the motor and the connecting rod is easy to rust. Spray rust remover before installation, and apply lithium-based grease to the ball head of the connecting rod (to reduce resistance); check whether the motor bracket is deformed (if it is deformed, it needs to be corrected before installation).
7. Wiper and wiper motor replacement: 5 common misunderstandings, must-see for novices
● Ignore the angle mark: The angle of the motor and the connecting rod and the direction of the wiring harness are not marked, which causes the wiper to swing abnormally after installation. Remember to "mark first and then disassemble”;
● Tool torque is too large: the electric wrench uses a high torque gear, which causes the screw to slip. It needs to be adjusted to a low torque gear or a manual wrench.;
● Skip the test steps: use it directly after installation, no water leakage or swing problems have been found, which may cause the motor to burn down or leak on rainy days.;
● Anti-installation of main and auxiliary wipers: The main driver's wiper is usually 2-5 inches longer than the co-pilot's. Anti-installation will scratch the edge of the glass. It needs to be marked and distinguished in advance.;
● Reset of missing waterproof parts: The waterproof and shockproof material of the deflector is not installed back, resulting in water leakage on rainy days. After installation, it needs to be checked one by one.
8. Real case practice: demonstration of wiper motor replacement for household cars
Combined with the previous skills, take a 10-year-old family car as an example to demonstrate the whole process of wiper and wiper motor replacement.:
1. Tool preparation (refer to the first part)
Phillips screwdriver (PH2), slotted screwdriver (6×100mm), 8-10mm socket wrench, marker pen, compartment storage box, neutral rust remover.
2. Wiper removal (combined with the second part to avoid pits)
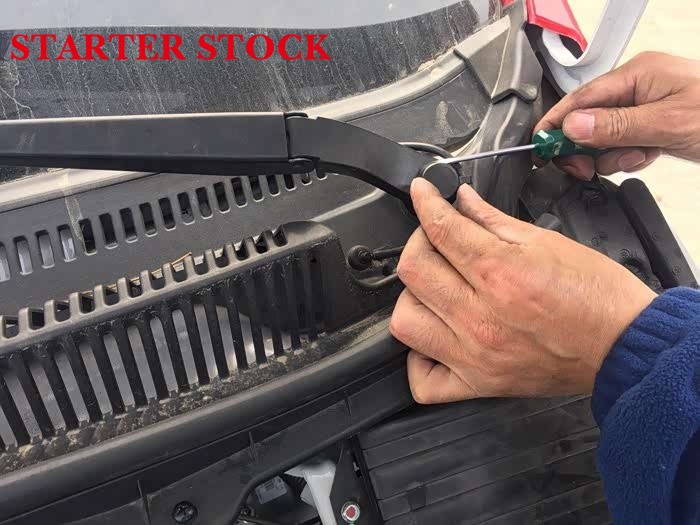
a. The cabin cover and gently pry the nut cover at the root of the wiper arm with a slotted screwdriver (avoid the buckle gap and it is not broken);
b. Press the water spray switch in the car, empty the residual liquid in the cleaning liquid pipe, press and hold the interface buckle to unplug the pipe;

c. Press the wiper arm with your left hand to press down, lift the wiper up with your right hand (no caton, smooth removal), and mark “main driver” and “co-pilot” with a marker pen;
d. Repeat the steps to remove the co-pilot's wiper and place it lightly on the ground covered with towels (anti-scratch rubber strips).
3. Deflector removal (combined with the third part of the steps)
a. Loosen the deflector screws in diagonal order (6 in total, no deformation);
b. Gently stir up the waterproof sponge at both ends and put it in the storage box;
c. Avoid the cleaning fluid pipe and place the deflector lightly on the cover of the cabin. At this time, the wiper motor (small black motor with 2 wiring harnesses) is completely exposed.
4. Disassembly of wiper motor assembly (combined with the fourth part of the marking technique)
a. Press and hold the unlock button of the wiring harness buckle, unplug the plug, and use a marker pen to draw an alignment line between the plug and the motor interface;
b. Draw a horizontal through line between the motor and the ball head of the connecting rod, and use a socket wrench to remove the 4 fixing screws in diagonal order;
c. Hold the connecting rod (to avoid spring rebound) and gently place the motor assembly on the ground (the connecting rod is facing up, no deformation).
5. Installation and testing of new motors (combined with the core steps of the fifth part)
a. Compare the old and new motors (screw holes and interfaces are exactly matched), align the connecting rods according to the through line, and snap into the ball head (hear the ”click" sound);
b. Screw in 2 diagonal screws, manually turn the motor shaft (the connecting rod swings smoothly), and then tighten the remaining screws;
c. Insert the wiring harness plug back according to the alignment line, install the deflector and waterproof sponge back, and put the main and co-pilot wipers on according to the mark;
d. Power-on test: low-speed / high-speed / intermittent gears are smooth, and the wiper stops at the bottom of the glass after closing; there is no leakage of water sprayed on the glass, the angle does not need to be fine-tuned, and the replacement is complete.


