

-
126
-
2025-07-21 09:09:18
Are you struggling with connecting a single-phase motor starter? You’re not alone.
Many people find themselves puzzled by the wiring and connections involved. But worry not, because this guide is here to simplify the process for you. By the end of this article, you’ll have the confidence to tackle this task with ease.
Imagine the satisfaction of powering up your motor without a hitch. You’ll not only save time but also avoid costly mistakes. So, let’s dive into the steps that will make you a pro at connecting a single-phase motor starter. Your journey to mastering this essential skill starts now!
Tools And Materials Needed
Connecting a single-phase motor starter requires specific tools and materials. Proper preparation ensures the task is safe and efficient. This section outlines the essential items needed for a successful connection.tools and materials. Proper preparation ensures the task is safe and efficient. This section outlines the essential items needed for a successful connection.
Tools Required
Having the right tools is crucial. Begin with a voltage tester. It checks the circuit's power status. A screwdriver set is also necessary. Different types of screws may need loosening. Pliers are useful for cutting and bending wires. A wire stripper makes removing insulation easy. Finally, use a multimeter. It measures electrical values accurately.
Materials Needed
Gather essential materials before starting. First, secure the motor starter. Choose one compatible with your motor. Next, have electrical wires ready. Ensure they are the correct gauge. Use wire connectors. They provide secure connections. Have electrical tape on hand. It insulates exposed wires. Lastly, a circuit breaker is necessary. It offers overload protection.
Safety Gear
Safety gear is vital. Wear insulated gloves. They protect against electrical shocks. Safety glasses shield your eyes from debris. A safety helmet protects your head from falling objects. Always prioritize safety while working with electricity.
Safety Precautions
Before connecting a single phase motor starter, prioritize safety. Proper precautions can prevent accidents and ensure a smooth installation. Understanding safety measures is crucial for both beginners and professionals.
1. Wear Protective Gear
Always wear protective gear, including gloves and goggles. This protects you from electrical shocks and flying debris. Safety gear is essential for a secure working environment.
2. Disconnect Power Supply
Ensure the power supply is disconnected before starting work. This prevents accidental electrical shocks. Use a voltage tester to confirm the absence of current.
3. Use Insulated Tools
Insulated tools reduce the risk of electric shock. They provide a safe grip and prevent electrical conduction. Always check tools for damage before use.
4. Check The Wiring Diagram
Consult the motor's wiring diagram for correct connections. Incorrect wiring can cause malfunctions and damage. Follow the diagram closely to ensure accuracy.
5. Avoid Wet Conditions
Keep the working area dry to prevent electrical hazards. Water increases the risk of electric shock. Always ensure your hands are dry when handling electrical components.
6. Secure Loose Wires
Check and secure any loose wires before powering the motor. Loose wires can lead to short circuits and fires. Use cable ties or clamps for better organization.
7. Test The Installation
After connecting, test the motor setup with care. Start with a low-voltage check to confirm connections. Ensure all components function properly before full operation.
Identifying Motor Terminals
Identifying motor terminals is crucial for connecting a single-phase motor starter. Understanding terminal labels ensures correct wiring and motor operation. Incorrect connections can cause malfunction or damage. This guide will help you identify motor terminals easily. Follow these steps for a safe and efficient connection.
Understanding The Motor Nameplate
The motor nameplate provides vital information about motor terminals. It includes details like voltage, current, and terminal configuration. Read the nameplate carefully to identify terminal markings. This helps in knowing the connection points and wiring requirements.
Locating The Terminal Box
The terminal box houses the motor terminals. Find it on the side or top of the motor. Once located, open the box to access the terminals. Ensure the power is off before opening the terminal box. This prevents electrical hazards during inspection.
Identifying Terminal Markings
Motor terminals often have markings like U1, U2, V1, V2. These markings indicate specific connection points. Refer to the motor nameplate for the exact configuration. Terminal markings guide you in wiring the motor correctly. Follow the labels for a successful connection.
Using A Multimeter For Verification
A multimeter helps verify terminal connections. Set the multimeter to resistance mode. Check continuity between terminals to confirm the right connections. This ensures the motor operates as intended. Verification adds an extra layer of safety to the process.
Consulting The Motor Manual
The motor manual is a valuable resource. It provides detailed instructions for connecting the motor. Refer to the manual for specific terminal configurations. Following the manual reduces errors and ensures proper functioning. Keep the manual handy for future reference.
Understanding Motor Starter Components
Connecting a single-phase motor starter involves linking essential components like the overload relay and contactor. Ensure each wire is securely attached to the corresponding terminal. Proper configuration guarantees smooth operation, preventing motor damage.
Understanding how to connect a single-phase motor starter can seem daunting, but breaking down the components makes it manageable. Each part of the motor starter plays a crucial role in its operation. Knowing what each component does can simplify the process and boost your confidence in wiring it correctly. Let's dive into the key elements that make up a motor starter.
Contactors
Contactors are the heart of the motor starter. They function as a switch, controlling the flow of electricity to the motor. When energized, contactors close and allow the current to pass, powering the motor. Imagine them as the gatekeepers of your electrical circuit. Without them, your motor would remain lifeless, unable to start or stop. Think about the importance of choosing the right contactor for your specific motor needs.
Overload Relays
Overload relays act as the protective shield for your motor. They ensure the motor does not draw excessive current, which can cause overheating. If the current exceeds safe limits, the relay disconnects the power, preventing damage. Consider overload relays as the motor’s safety net. Have you ever experienced a tripped circuit breaker at home? Overload relays work similarly, but with precision tailored to your motor’s specifications.
Control Circuit
The control circuit is the brain behind the operation. It encompasses all the wiring and switches that allow you to command the motor starter. This circuit dictates when the motor should start, stop, or adjust its operation. Picture it as the control panel for a complex machine. Have you ever used a remote control for your TV? The control circuit functions like that, giving you the power to manage the motor’s activity with ease. Understanding these components is essential for connecting your single-phase motor starter efficiently. What challenges have you faced in wiring a motor starter? Knowing the purpose of each part can help you navigate those obstacles and enhance your electrical projects.
Wiring Diagram Basics
Understanding the basics of a wiring diagram is crucial for connecting a single-phase motor starter. These diagrams serve as a map, guiding you through the connections needed. They ensure each wire and component is correctly placed. This prevents errors and ensures safety. Let's explore the key elements of wiring diagrams.
Understanding Wiring Symbols
Wiring diagrams use symbols to represent components. A motor is often shown as a circle. Lines represent wires connecting these components. Recognizing these symbols is essential. It simplifies the connection process. This prevents confusion and errors.
Identifying Power Sources
Every motor starter needs a power source. In diagrams, power sources are shown clearly. Look for symbols like a battery or a plug. This helps in identifying where to connect the motor. Correctly identifying power sources ensures efficient operation.
Tracing The Circuit Path
Follow the circuit path on the diagram. This path shows the flow of electricity. It connects the power source to the motor. Tracing this path helps in understanding the circuit. It ensures all components are correctly connected.
Locating Control Elements
Control elements like switches are crucial. They regulate the motor's operation. Wiring diagrams show their placement. Identify these elements to complete the circuit. Proper connection of control elements enhances functionality.
Checking For Safety Components
Safety components protect the motor. These include fuses and circuit breakers. Wiring diagrams indicate their positions. Always ensure these are correctly connected. Proper placement ensures safe operation.
Preparing The Motor Starter
Connecting a single-phase motor starter can seem daunting at first glance. However, with a little preparation, you can ensure a smooth and efficient setup. Preparing the motor starter involves two key tasks: mounting the starter and inspecting connections. By focusing on these areas, you minimize the risk of errors and ensure optimal performance. Let’s dive into the specifics of these tasks and make your motor starter ready for action.
Mounting The Starter
The first step is to mount the starter securely. Choose a location that's dry and free from dust and moisture. This helps protect your equipment and ensures longevity.
Use screws or bolts that are suitable for the surface. Whether it's wood or metal, ensure they hold the starter firmly in place. This prevents any unwanted movement that could disrupt your setup.
Consider the accessibility. You should be able to reach the starter easily for any adjustments or inspections later on. It saves time and hassle when troubleshooting.
Inspecting Connections
After mounting, inspect the connections thoroughly. Check the wiring for any signs of wear or damage. This includes frayed wires or exposed insulation, as these can lead to short circuits.
Ensure all connections are tight and secure. Loose connections can cause faulty operations and pose safety hazards. A simple screwdriver can make all the difference.
Verify the labeling. Make sure each wire is correctly labeled and matches the terminal markings. This prevents confusion and ensures a correct setup, especially if you're not familiar with electrical systems.
These steps might seem straightforward, but they are crucial. Have you ever rushed through a setup only to face unexpected issues later? Taking the time to prepare your motor starter properly can save you headaches down the line. What other precautions do you think are essential for this task?
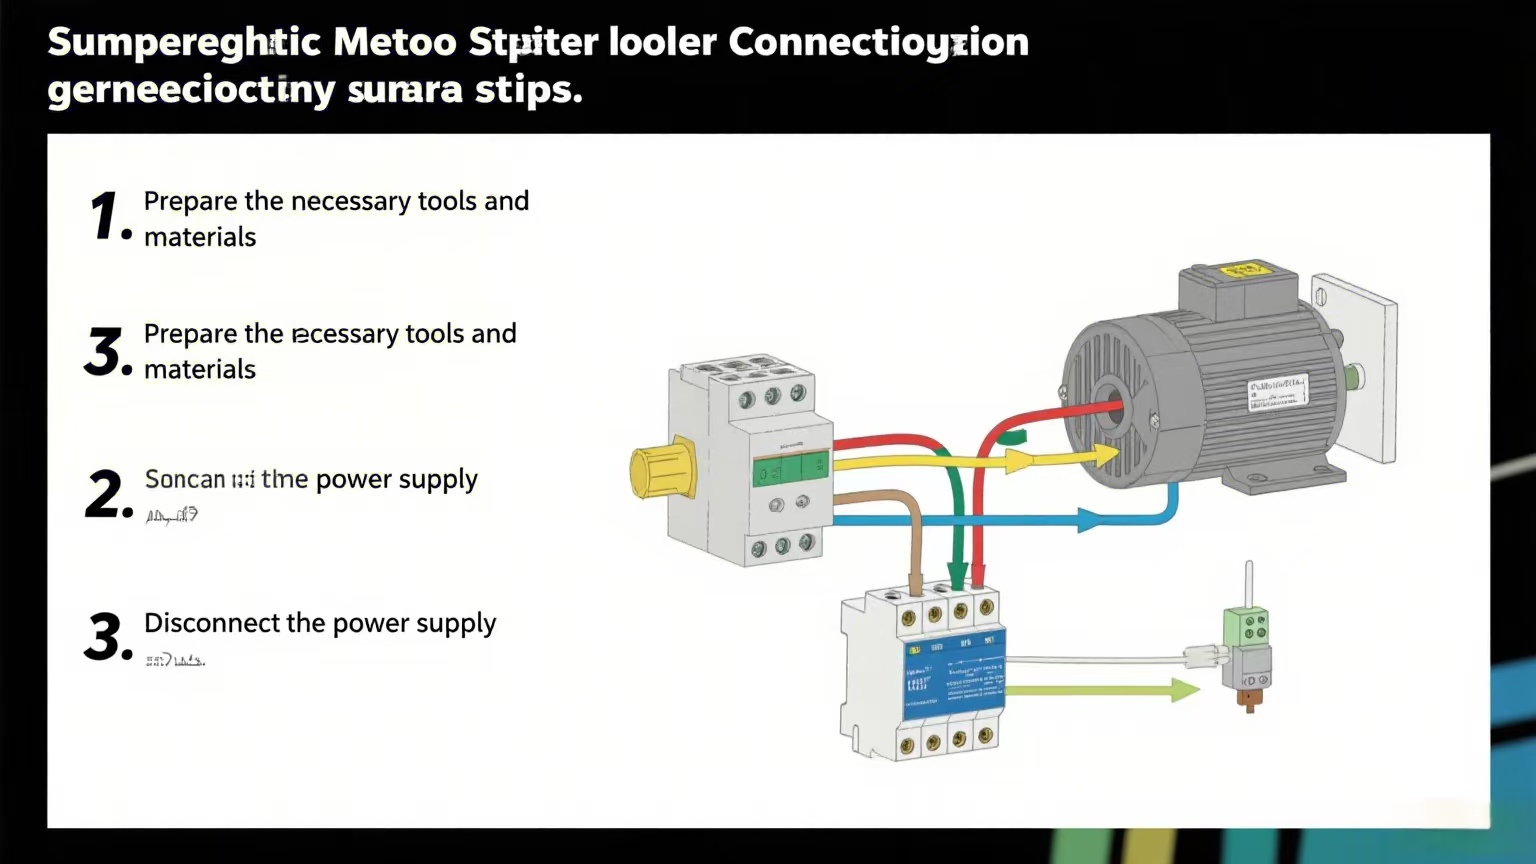
Connecting Power Supply
Connecting the power supply to a single-phase motor starter is crucial. This process ensures the motor receives the correct voltage and operates efficiently. Proper connections prevent electrical faults and enhance motor performance. Let's explore the steps to connect the power supply effectively.
Identifying Power Cables
First, identify the power cables. Typically, you will find three cables. These include live, neutral, and ground wires. The live wire carries the current to the motor. The neutral wire completes the circuit. The ground wire ensures safety by preventing electric shocks.
Check the cable colors for identification. Usually, the live wire is red or brown. The neutral wire is blue or black. The ground wire is green or yellow-green. Verify cable identification before proceeding.
Securing Connections
Next, secure the connections. Use a screwdriver to loosen the terminal screws. Insert the live wire into the live terminal. Tighten the screw to secure it. Repeat this for the neutral and ground wires. Ensure each wire is firmly connected.
Double-check the connections for any loose wires. Loose connections can cause electrical faults. Ensure the wires are not touching each other. Proper spacing prevents short circuits. Once secure, test the motor operation.
Wiring The Control Circuit
Connecting a single-phase motor starter involves setting up the control circuit. This essential step ensures safe and efficient motor operation. Proper wiring of the control circuit is crucial for smooth functionality. Focus on understanding each component to avoid errors. Let's dive into the details.
Connecting Start And Stop Buttons
The start and stop buttons play a vital role. They control motor activation and deactivation. First, locate the start button terminals on the starter. Connect one wire to the start button terminal. Then, attach the other end to the starter's control terminal. Repeat the process for the stop button. Ensure wires are firmly secured to prevent disconnection.
Integrating Overload Protection
Overload protection safeguards the motor from damage. It automatically disconnects power during excessive loads. Find the overload relay on the starter. Connect its terminals to the motor's main supply line. This setup ensures motor safety during operation. Adjust the relay settings according to motor specifications. Proper integration prevents motor burnout.
Testing The Setup
Connecting a single-phase motor starter involves testing the setup efficiently. First, ensure all wires are securely connected to the starter terminals. Then, power on the system and observe the motor's response for any unusual sounds or movements, indicating proper installation.
Testing your single-phase motor starter setup is a crucial step to ensure everything is wired correctly and functions as expected. This stage is not just about confirming your connections; it's about ensuring safety and optimal performance. After spending time wiring and setting up the motor starter, it's exciting to see it come alive, but it's also where diligence pays off. ###
Verifying Connections
Before you flip the switch, double-check every connection. It's easy to overlook a loose wire or a misplaced terminal, especially after a long installation process. Use a multimeter to check for continuity and ensure that wires are connected as per the motor's wiring diagram. This tool can be your best friend, providing a clear indication that power will flow correctly through your setup. Imagine the frustration of a motor that doesn't start because of a simple wiring mistake. Taking a few extra minutes now can save hours of troubleshooting later. ###
Checking Motor Rotation
Once you're confident in your connections, it's time to check the motor's rotation. Start the motor briefly and observe its direction. If the motor is rotating incorrectly, you might need to swap two of the wires on the starter. This adjustment is straightforward but essential, especially if the motor is part of a system where direction matters, like a conveyor belt or fan. Have you ever experienced a machine working in reverse? It can be quite surprising and potentially damaging. By ensuring the correct rotation, you not only protect your equipment but also enhance its efficiency. Testing the setup is where your careful planning and execution come together. Each successful test is a step closer to achieving a reliable and efficient motor starter system.
Troubleshooting Common Issues
Connecting a single-phase motor starter can sometimes present challenges. Knowing how to troubleshoot common issues can help. This ensures smooth operation and minimizes downtime. Here, we explore typical problems and their solutions.
Motor Not Starting
The motor not starting is a frequent issue. First, check the power supply. Ensure it's connected and functioning. A loose wire can disrupt the circuit. Inspect all connections for tightness. Also, examine the switch. A faulty switch can prevent the motor from starting. Replace it if necessary. Lastly, test the motor winding. Use a multimeter to check resistance. An open winding indicates damage. Consider professional repair if needed.
Overload Tripping
Overload tripping often occurs due to excess current. First, verify the motor load. Ensure it's within the rated capacity. An overloaded motor will trip frequently. Check for mechanical issues too. Blockages or friction can increase load. Address these issues promptly. Next, inspect the overload relay. It might be set too low. Adjust it to the correct setting. If the relay is faulty, consider replacing it.
Maintenance Tips
Maintaining a single phase motor starter ensures long-lasting performance. Regular care reduces unexpected failures and costly repairs. These maintenance tips will help keep your motor starter in top condition.
Regular Inspection
Inspect the motor starter monthly. Look for signs of wear or damage. Check connections for tightness. Loose connections can cause malfunctions. Examine the insulation for cracks or wear. Replace any worn-out parts immediately.
Cleaning Contacts
Dust and debris can affect contact performance. Clean the contacts every six months. Use a soft, dry cloth to remove dust. Avoid using water or liquids. If needed, use a contact cleaner spray. Ensure all power is off before cleaning. This prevents electric shocks and accidents.
Frequently Asked Questions
What Is A Single Phase Motor Starter?
A single phase motor starter helps in safely starting and stopping motors. It provides overload protection and allows smooth operation. Starters are essential in controlling the motor's current flow, ensuring durability and efficiency.
How To Wire A Single Phase Motor Starter?
Wiring a single phase motor starter involves connecting power supply, motor, and control components. Always refer to the manufacturer's manual. Ensure connections are tight and secure to prevent electrical issues.
Why Use A Single Phase Motor Starter?
Using a single phase motor starter ensures motor longevity and safety. It prevents electrical overloads and offers controlled starting and stopping. This boosts efficiency and reduces wear on the motor.
What Are Common Issues With Motor Starters?
Common issues include overheating, loose connections, and faulty components. Regular maintenance checks can prevent these problems. Early detection ensures minimal downtime and protects the motor.
Conclusion
Connecting a single phase motor starter is straightforward. Just follow the steps carefully. Ensure all safety measures are in place. Double-check connections for accuracy. Proper setup prevents issues later. Use the right tools for the job. Consult a professional if unsure.
Mistakes can cause damage or injury. Take your time to understand the wiring. It's essential for smooth operation. A correctly installed motor starter improves efficiency. Enjoy a reliable and efficient motor performance. Stay safe and follow guidelines closely.


